Advertisement

Improve Your Fishing Photography with Tips from 10 Pros

Suggestions that will help turn your fishing photos into keepers
001 olander - opener.jpg
Too many of us have experienced the disappointment of realizing the photos we took of a trophy catch or of an exciting battle or dramatic fishing scene turned out, well… just crappy. When such a rare opportunity arises, the ability to capture it effectively is one that will, for you and others with whom you want to share the moment, pay off nicely. Toward that end, I asked 10 of the great professional fishing photographers whose work regularly appears in Sport Fishing magazine and on SF’s web site to share with our audience just one tip that comes to mind — one tactic each uses to make his photography better. Of course luck and timing inevitably play some part in all this. But click through and let these 10 SF pros help you rely less on luck and more on an ability to “get the shot.”
01 jason arnold (tarpon).jpg

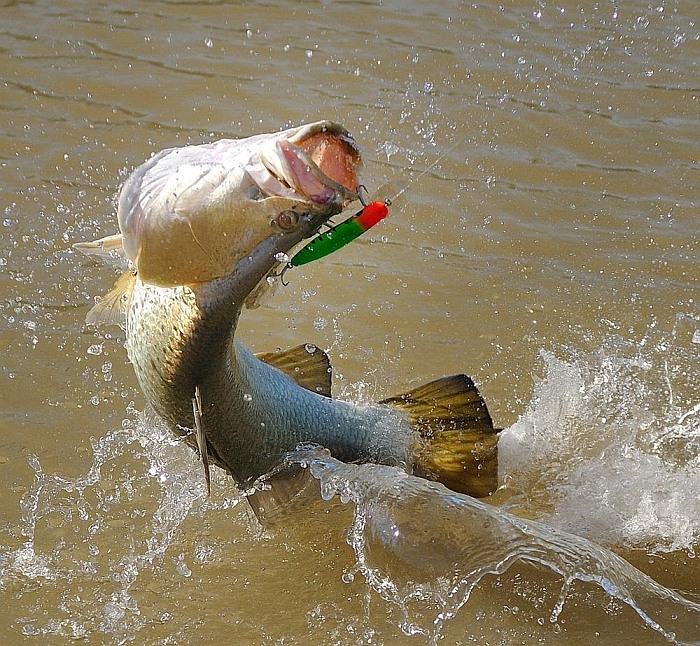
STOP THE ACTION (Using Aperture Priority)

The modes on a typical digital SLR (single-lens reflex) camera are Automatic, Program Automatic, Shutter Priority, Aperture Priority and Manual. Displayed by the letter A on a Nikon and the letters AV on a Canon, the aperture is shown as an F-stop number, which determines how much light is taken into the camera’s sensor. When we set the camera’s aperture in aperture-priority mode, we’re allowing the camera to determine the matching shutter speed. On a bright sunny day, this is usually the best setting to use. Many sports-photography pros use aperture-priority mode. What we are looking at doing in this mode is setting a very large aperture, which ironically means a small f-stop number, such as f2.8 or f4, depending upon one’s camera. That small f-stop means the camera is allowing in the most possible light, so the camera will choose a fast shutter speed for the correct exposure. (Conversely, setting a narrow aperture would tell the camera to slow the shutter speed.) And a faster shutter speed helps freeze the action. For this tarpon shot, I set a Nikon D800 with an f/4 aperture and the camera took the shot at 1/2000th of a second, plenty fast to stop the action! — Jason Arnold Jason Arnold
02 tosh brown 1 of 2.jpg

TRY NEW ANGLES (First of two photos)

According to Wikipedia, the average height of the American populace is approximately 5 feet 8 inches. Since most of our eyes are a few inches below the top of our domes, that means that a large portion of general fishing photos are shot on a horizontal plane that’s a little more than 5 feet above the ground. To improve your photography, change up the perspective: Find new angles to shoot from. While this image might push the extremes of “getting above your subject,” it illustrates what’s possible with a little in situ engineering. I used a Bogen clamp to anchor my DSLR atop the push pole, and a simple remote shutter release to fire the camera. (This sort of thing can also be done using the self-timer feature on your camera.) — Tosh Brown Tosh Brown
03 tosh brown 2 of 2.jpg

TRY NEW ANGLES (Second of two photos)

Since most quality point-n-shoot cameras are now, at the very least, “water resistant,” here’s another great way to gain a cool perspective. In this shot, an approaching thunderstorm and an angler wading back to the skiff become much more interesting when shot from a low angle. Check your camera’s waterproofing, and if it’s up for it, give it a dunk! — Tosh Brown Tosh Brown
04 tim simos, background (wrong) 1 of 2.jpg

CLEAN UP YOUR ACT (First of two photos)

The wrong way: Including the rod in a photo with an angler is great, as it shows what tackle was used. But too often, rods in the background are distracting, especially when “sticking out” of the angler’s head. That’s all it took to mess up an otherwise appealing photo here. — Tim Simos
05 tim simos, background (right) 2 of 2.jpg

CLEAN UP YOUR ACT (Second of two photos)

The right way: Simply asking someone to pull the rod from the holder behind this young lady can remove that distraction. The result is a much nicer shot. — Tim Simos
06 al mcglashan img_0106.jpg

LEAVE ‘EM SMILING

Once you’ve removed any objects of distraction such as rods or other people in the background, for God’s sake, make sure the angler is smiling. It’s amazing how a smiling/excited angler will make a photo stand out as opposed to an angler who looks unhappy! This photo of yours truly shows what I mean. Make a joke, tickle ’em or whatever it takes before you push the shutter. — Al McGlashan
07 will drost.jpg

ZOOM IN

Today’s waterproof point-and-shoots and action cameras capture high-quality images but are usually limited to affixed wide-angle lenses. While DSLR’s are not completely waterproof, manufacturers such as Nikon and Canon have gone to great lengths to “water seal” their products. These cameras are physically tough too. With a DSLR and a 70-200mm f2.8 lens, photographers have the advantage of interchangeable zoom lenses with good range. That zoom ability can allow you to take advantage of opportunities like this one, that shallow-marsh reds feeding on shrimp, offered. — Will Drost
08 sharman, 1 of 3 - thirds.jpg

RULE OF THIRDS (First of three photos)

A lot of fishing photography involves getting up to happy angler and fish, but what about when you want to step back and want to take a cool scenic shot? Most serious photographers use a technique to help them compose their photographs that they call the rule of thirds. It’s by no means an absolute but can be a great tool to help make the difference between taking an average shot and one that is much more striking. The idea is to get away from always placing everything centrally by default. Basically think about looking at scene, and dividing it up by drawing two vertical and two horizontal lines across it, i.e. into thirds, as shown here. The points where the lines meet (the X‘s) offer four hot spots at which you should try locating your subject; you can move the camera around to see which point looks best. — Paul Sharman
09 paul sharman, 2 of 3 (thirds).jpg

RULE OF THIRDS (Second of three photos)

The wrong way: In this example, you can see that the skiff is somewhat lost in the overall picture; I have not positioned the camera so the skiff is at one of the four hot spots. Additionally there is a bit of vegetation on the left-hand side and some weed on the bottom in the foreground, both of which are distracting. — Paul Sharman
10 paul sharman, 3 of 3 (thirds).jpg

RULE OF THIRDS (Third of three photos)

The right way: In this shot, the skiff is now situated over one of the hot spots, and the other distractions are removed. This gives a much greater sense of the anglers and the skiff entering the scene, and you can’t help but start scanning in front of them just as they’re doing, for signs of fish within casting range. Try using this rule of thirds next time you’re shooting on the water and compare your results to simply placing your subjects in the middle of the picture as you have done so often, before. — Paul Sharman
11 mark hatter dsc_3098.jpg

CHECK YOUR BATTERIES

Ever land “the BIG one” only to discover that your camera has no charge left on the battery? If you have a checklist for a day of fishing, add “camera-battery recharge” to it. Otherwise , a simple post-it note on the camera lens cover stating “Charge me!” is a great reminder when you pull out the camera to take on your trip. — Mark Hatter
12 peter zeroni, barra.jpg

STOP THE ACTION (Using Shutter P riority)

You can set a DSLR camera to aperture priority, and that will control the shutter speed as a function of the aperture (the diameter the lens opens to let in light). I prefer to set the shutter speed myself by selecting the “S” for shutter-priority mode. For action, the faster the speed the better. The brighter the conditions, the faster the shutter speed you can get. But be warned, trying to capture that perfect jump shot can easily turn into a lifelong quest! — Peter Zeroni
13 sam root, dsc_7642.jpg

MIDDAY FLASH WITH A NEW ANGLE

One of the most essential fishing images is the “grip and grin” — the angler holding his or her prize catch and smiling, hence the name. If the catch happens first thing in the morning or last part of the day, shooting with the sun behind you works out nicely. Of course this can’t always be the case. Fish don’t necessarily eat only during optimal lighting periods. Many times the lighting is too bright, and directed at wrong angles, creating harsh and unflattering images. There’s a very simple way to improve your images to make them look quite good even with a standard point-and-shoot. Try shooting the photo with the sun behind the subject (not behind you, the photographer) and use the fill flash. This method accomplishes several things. The subject no longer has to squint. Shooting this way evens the out the lighting, making it easier for the camera to meter. And best of all, it takes away harsh lighting that creates unsightly and unflattering shadows. A simple change of angle and a fill flash can make a dramatic difference in your midday photography. — Sam Root
14 rick de paiva, flash blowout (wrong) 1 of 2.jpg

AVOID BLOWOUTS ON THE WATER (First of two photos)

The wrong way: While fill flash is a good thing, if you’re not careful, the flash can “blow out” the naturally reflective sides of silver fish such as tarpon or sea trout. Note the head on this redfish. Simply turning on the fill flash makes the silvery gill covers too bright and the detail in them is lost. — Rick De Paiva
15 rick de paiva, flash blowout (right) 2 of 2.jpg

AVOID BLOWOUTS ON THE WATER (Second of two photos)

The right way: Compare the preceding photo to this one. If your flash gives you the option, tilt it away from the gill plate to the mid/upper body area. If flash can’t be tilted, try changing the angle from which you shoot so you’re at more of an angle to the fish’s shiny head (and in some cases, sides). — Rick De Paiva
Advertisement
Advertisement